MIGRATE YOUR APPLICATION/LIBRARY TO .NET CORE/STANDARD
An F# eXchange 2018 workshop
Sample 1 - console app
In a sample1 directory, run
mkdir sample1 && cd sample1
dotnet new
Now let’s create a console app
RUN
dotnet new console -lang f#
let’s open code to inspect it, run
code .
A normal console app is:
- a
sample1.fsproj: the project file. - a
Program.fs: the source file
Open the Program.fs in the editor
This is the entrypoint of the of the program, the main and the args passed to the console app
When ionide is started, make the F# PROJECT EXPLORER visible on bottom-left corner of code.
This contains the projects loaded
Now, let’s build it. It can be done in the the terminal
TIP code has an embedded terminal. Open it with View -> Integrated Terminal
dotnet build
run
dotnet build
This compile the project and show the output:
Microsoft (R) Build Engine version 15.6.82.30579 for .NET Core
Copyright (C) Microsoft Corporation. All rights reserved.

  Restore completed in 37,31 ms for E:\fsharpx\sample1\sample1.fsproj.
  sample1 -> E:\fsharpx\sample1\bin\Debug\netcoreapp2.0\sample1.dll

Build succeeded.
    0 Warning(s)
    0 Error(s)

Time Elapsed 00:00:01.23
So the output is bin/Debug/netcoreapp2.0/sample1.dll
To run it:
dotnet bin/Debug/netcoreapp2.0/sample1.dll
Now let’s pass some arguments. First change the program to print the arguments.
DO add to the main
printfn "%A" argv
dotnet run
Now another time, compile and execute. Run:
dotnet build
dotnet bin/Debug/netcoreapp2.0/sample1.dll a b --other a
A faster way to do it, is use dotnet run command, who does the same thing
dotnet run -- a b
dotnet publish
What if i want to use my app in another machine?
Two possibilities of deployment:
framework dependent(FDD)- CONS require .net core runtime installed in target machine
- CONS executed as
dotnet app.dll - PRO same binaries for all os
- PRO small size of binaries
self contained(SCD)- CONS bigger size of binaries
- CONS distinct binaries for all os
- PRO is a normal native app (
app.exeorapp) - PRO doesnt require .net core runtime installed on target machine
- CONS require .net core deps (like libunwind, see docs) installed
First let’s try FDD
Run
dotnet publish
This create the bin/Debug/netcoreapp2.0/publish/ directory
who can be copied in another machine, and run with
dotnet sample1.dll
Now a SCD, in another directory
Run
dotnet publish --runtime win-x64 --output out
and that directory out contains sample1.exe you can run directly as out\sample1.exe 1 2 3
Doing the same for osx
dotnet publish --runtime osx-x64 --output outosx
Or linux, run
dotnet publish -r linux-x64 -o outlinux -c Release
NOTE on linux .net core apps has some requirements, like the libunwind package installed (see docs)
NOTE to know your local os runtime id (called RID like osx-64), just do dotnet --info
Runtime Environment:
 OS Name:     Windows
 OS Version:  10.0.16299
 OS Platform: Windows
 RID:         win10-x64
NOTE is possibile to bundle these deps as local copies, ref https://github.com/dotnet/core/blob/master/Documentation/self-contained-linux-apps.md
NOTE the runtime can be specified also in the fsproj
<RuntimeIdentifiers>win10-x64;osx-x64</RuntimeIdentifiers>
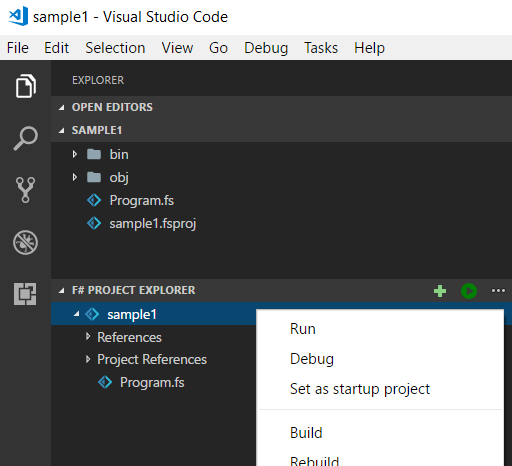
Ionide vscode integration
To run it in debugging, without any setting, just:
- Set a breakpoint, in the column on the left of the line
- Right click on the project
- do
Debug
VSCode settings
Let’s configure VS Code to build/debug this project VSCode use tasks to run things.
- VSCODE
> Tasks: Configure Default Build Task - choose
create task.json from template - choose
.NET Core
If there are no error, default behavior is not show message. you can override with
            "presentation": {
                "reveal": "always"
            },
To run it:
- VSCODE
> Tasks: Run Build Task - choose
build
So now the default run build use that
If there is an error, are shown in PROBLEMS tab
You can move between errors with
- VSCODE
> Go to Next Problem
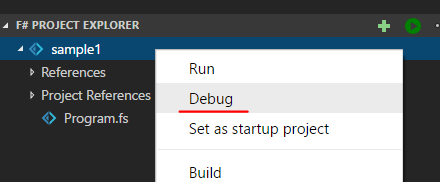
Now, to debug
- Set a breakpoint, in the column on the left of the line
- Right click on the project in
F# PROJECT EXPLORER Debug
Or you can create a launch.json with info about debug with:
> Debug: continue- choose
.NET Core - set
programpath to output assembly
now F5 and > Debug: continue will run as usual
External package
For example we need to parse the command line arguments We want to use Argu library
to manage the packages in the project, we can use the dotnet add and dotnet remove commands
dotnet add package Argu
this add a packagereference to the project
<PackageReference Include="Argu" Version="3.7.0" />
and restore the project (download the package).
We can now use argu to manage command line args First declaring the arguments
open Argu

type CLIArguments =
    | Port of tcp_port:int
with
    interface IArgParserTemplate with
        member s.Usage =
            match s with
            | Port _ -> "specify a primary port."
and doing the parsing in the main
    let parser = ArgumentParser.Create<CLIArguments>(programName = "sample1")

    try
        let args = parser.Parse argv

        match args.GetAllResults() with
        | [Port p] -> printfn "set port %i" p
        | _ -> ()

        0 // return an integer exit code
    with
    | :? ArguParseException as ex ->
        printfn "%s" ex.Message
        1
    | ex ->
        printfn "Internal Error:"
        printfn "%s" ex.Message
        2
to check is working:
dotnet run -- --help
dotnet run -- --port 81
NOTE by default configuration, the --help raise an exception in Argu.
Try with debugging, you can see the ex.ErrorCode is HelpText
Multi Targeting
The sdk support multi target framework as first class.
Change from
<TargetFramework>netcoreapp2.0</TargetFramework>
to the PLURAL, the is an s at end ( <– PLURAL )
<TargetFrameworks>netcoreapp2.0;net471</TargetFrameworks>
You can add all tfm you want netcoreapp2.0;net452;net462 etc.
Same for libraries
Now just restore
dotnet restore
and to build all frameworks, just dotnet build
Use dotnet build -f netcoreapp2.0 to build just one.
All commands (test, etc) have a --framework of -f parameter
You can conditionally add msbuild items (like Compile, PackageReference or ProjectReference) with the attribute Condition=" '$(TargetFramework)' == 'netcoreapp2.0' "